

The global crypto wallet market is estimated to grow at a CAGR of 26.3% from 2025 to 2033.
Following this demand, fintech and payment infrastructure companies are increasingly adding embedded wallets in order to offer crypto features to their users. Still, security remains a top concern for both organization-controlled and user-controlled assets.
Turnkey’s Wallet-as-a-Service (WaaS) platform addresses these concerns by providing flexible ways to manage wallets using secure enclaves (a type of Trusted Execution Environment). Central to this is the ability of apps built on Turnkey to not only create and manage these wallets but also enable policy-based controls for their end-users.
In this post, we'll explore how app builders can use Turnkey to implement an account with multiple wallets and granular policy controls. This model is useful for scenarios like assigning a wallet for savings (sometimes called a “cold wallet”) and a wallet for daily transactions (a “hot” wallet), or creating wallets owned by a team with multiple user roles, among many other fintech and payment use cases.
What are parent organizations and sub-organizations?
The parent organization (or organization) in Turnkey represents a set of top-level resources. It can contain a group of different users, wallets, and permissions, but it typically represents the team, project, institution, or company building an application.
For example, a payment processor will sign up as a parent org, add team members as users (setting relevant permissions), and create wallets to handle their own assets.
Sub-organizations function very similarly to the parent organization – they have their own users, wallets, and permissions. The key difference is that sub-organizations are created by a parent organization and exist under it.
By default, parent organizations have read-only access to their sub-organizations, and sub-organizations act as segregated units under the parent organization. In embedded wallet setups, they typically map to an end-user. The end-user then has their own wallets and permissions separate from the actual parent organization.
Learn more about both of these organizations in our documentation.
Now that we understand how parent and sub-organizations work in Turnkey, let’s walk through how a typical application might use them to manage end-user wallets with built-in policy controls:
1. Create a sub-organization to represent an end-user
2. Create a first wallet for the user (can be done during the creation in step 1). This will be our “cold” wallet.
3. Create a second wallet - for example, this can be our “hot” wallet for day-to-day transactions.
4. Apply policy controls to each wallet to define things like transfer limits, whitelisted addresses, or approval requirements.
We’ll show how to do this below using Turnkey’s API and SDKs, plus get deeper into how policies work, with code examples included.
Creating a sub-organization through Turnkey's API
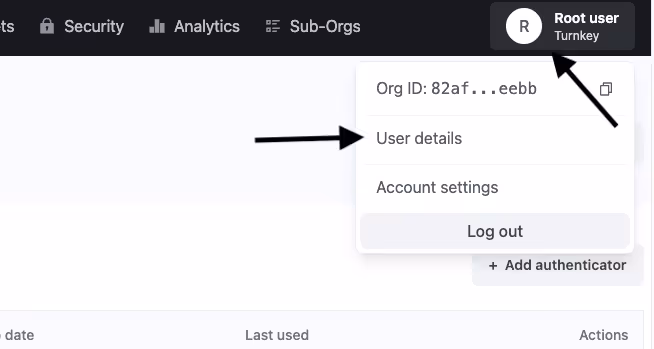
To create a sub-organization programmatically, you'll first need to create an API keypair through Turnkey's dashboard. When logged into the Turnkey dashboard, click on your icon in the top-right-hand corner and click user details.
Then, on this page, click the “Create API Key” button in the lower left-hand corner.
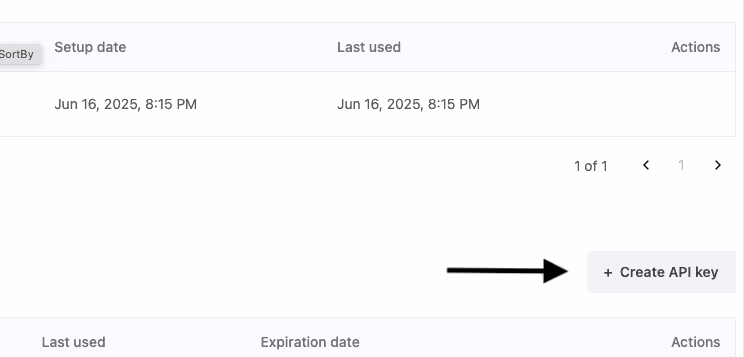
Turnkey can generate API keys in a couple of different ways, either via a browser or via the Turnkey CLI. After you select the method and name the API key, you can then go ahead and create it.
The private key provided in this instance acts like a typical API key compared to other services. It controls what you, as a user, can do on Turnkey – so this is displayed once for safety and should be kept private (i.e., only used server-side, not exposed in GitHub repositories, etc.).
Once you have a keypair, you can use it to make API calls to Turnkey and call the `CREATE_SUB_ORGANIZATION` endpoint. In this example, we'll use the JS/TS SDK to keep things simple and demonstrate how you could set up a client and call the relevant endpoint.
This works on the server-side of your NextJS application, a standalone NodeJS server, etc. Turnkey also provides a browser SDK and a React SDK.
Install the Turnkey server SDK
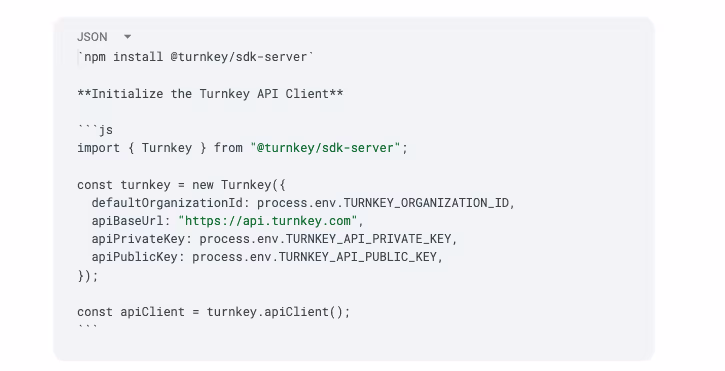
As with most API clients, you need to provide an API keypair generated previously. The API private key should remain private, which is why we initialize the API client on the server, not on the browser.
Creating a sub-organization
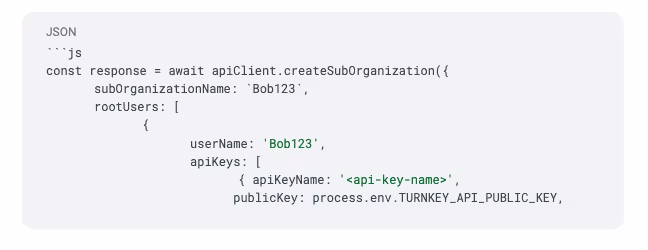
Next, we want to create the sub-organization by implementing the following code.
Let's break this down:
subOrganizationName
This is the name given to the sub-organization. This could be passed in from the frontend of an application.
rootUsers
This sets up the users inside of a sub-organization. Root users have the highest level of authority within a Turnkey organization. This is distinct from regular users who have only limited permissions as defined by the root user.
For our purposes, we are using the root user to represent a single user, so we only pass a single object into the array. This contains a userName, and can also optionally contain an email or phone number (see the full API reference).
There are then three other fields here: apiKeys, authenticators, and oauthProviders. Here we can use an API key, an authenticator, or an OAuth provider to verify identity.
For simplicity in this example, we leave authenticators empty and pass in our API name and key. This means we are signing and approving any actions related to a sub-organization with the parent-org’s private key, meaning the wallet is controlled by the holder of the API key.
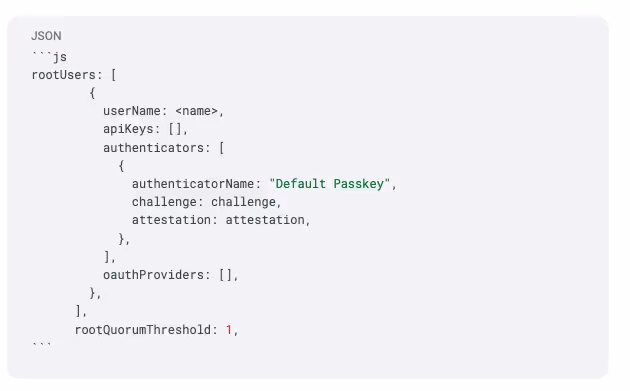
In practice, you may instead have users be the stewards of their own accounts via an authenticator that only they have access to. For example, you could use the Turnkey Passkey Client in your frontend and pass the attestation to your server to authenticate requests. This would make the sub-organization totally non-custodial.
For example, the body of rootUsers might instead look something like this.
rootQuorumThreshold
This specifies how many users of a sub-organization must approve an action for it to take place. As the sub-organization only contains a single user, the threshold is 1.
Learn more in Turnkey’s documentation on Root Quorums.
Creating wallets for a sub-organization
Alongside the creation of a sub-organization, we can also create a wallet for a user by importing `DEFAULT_ETHEREUM_ACCOUNTS` (or any other kind of account, e.g., SOL, or TRON), and passing it as a wallet object with the `createSubOrganization` method.
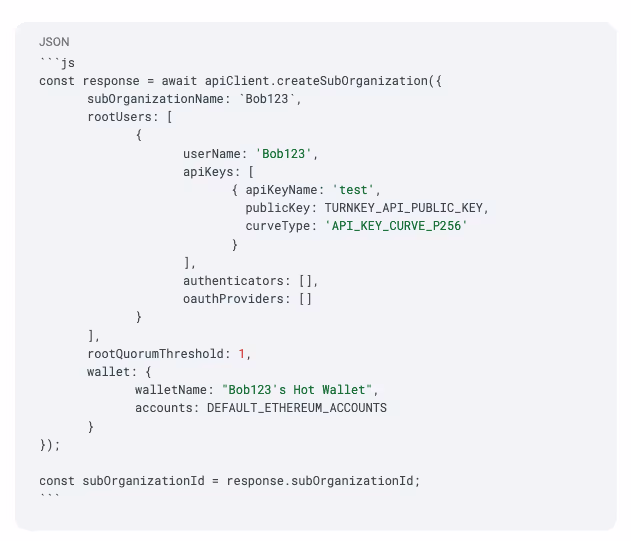
Here we've created the first wallet, a hot wallet. The response will return the created sub-organization's ID, which we store in `response.subOrganizationId`.
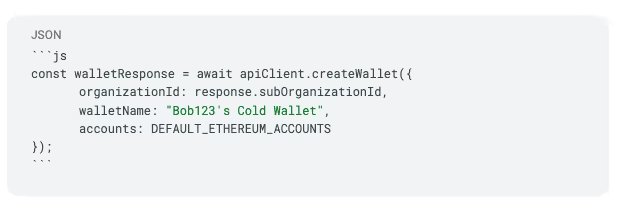
We can add a second wallet using the `createWallet` method:
Now we can create policies for each account using Turnkey's Policy Engine to give certain properties or permissions to each wallet.
Understanding policies in Turnkey
Turnkey has a built-in Policy Engine, which allows you to define precise, programmable rules for how wallets and users can operate — things like who can sign, how much can be sent, or which addresses are allowed.
Policies are defined using JSON. Each one describes who can take an action, under what conditions, and whether that action should be allowed or denied. Here's an example of what a simple policy might look like:
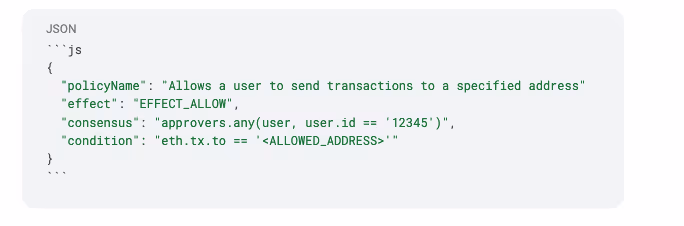
policyName
The name describes what a policy does, set by the business or parent organization.
effect
This is either set to `EFFECT_ALLOW` or `EFFECT_DENY`. Developers should ask themselves: will passing this policy allow an action, or deny an action?
In the example above, it allows a single user to send transactions to a single address. You could just as easily create a policy that denies the action of transferring to certain addresses, for example, known malicious contracts.
consensus
Details the users that the policy applies to, and can be used to require multiple users to approve actions under the defined conditions.
condition
Conditions are where most of your policy logic lives. They can be simple or more involved, depending on your needs.
Conditions define the specific logic that must be true for the policy to apply. They can check things like wallet ID, transaction amount, or destination address.
Creating wallet policies
Let's imagine a couple of simple policies for an end user's hot and cold wallets.
They might, for example, want to use the cold wallet more like a savings account. In this instance, maybe only transfers to a specified whitelisted account should be allowed, so large sums of money can’t be transferred to possibly malicious smart contracts or unknown addresses.
For a hot wallet, it might be desirable to only allow transfers of 0.1 ETH or smaller, in order to protect the user from losing large amounts of funds if a mistake is made when making a transaction.
Let's look at the body of these two policies, and then add them to a sub-organization.
Cold wallet policy
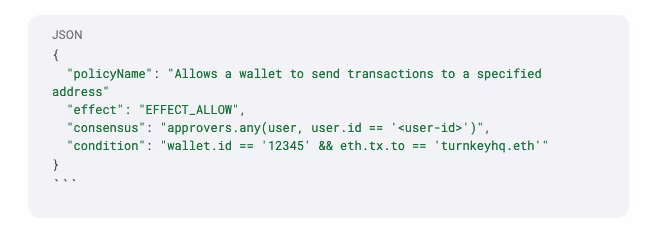
In this policy, the consensus lets a specific user (i.e., the user of a sub-organization) take a specific action. We would replace the `<user-id>` with the actual user's ID associated with a sub-organization.
The condition specifies a `wallet.id` - this would be replaced by the Cold Wallet's id, and `eth.tx.to` allows transfers only to a specified address (we've used `turnkeyhq.eth` as an example).
Hot wallet policy

The hot wallet policy follows a similar structure, but we've updated the condition to use another `wallet.id` (i.e., the hot wallet), and to only allow transactions equal to or smaller than `100000000000000000` wei (or 0.1 ETH).
In both policies, the conditions are joined by `&&`, which specifies that both conditions must be true for the policy to execute.
Now let's show a couple of examples of how you would set these policies using the Turnkey API.
Adding policies to sub-organizations via the Turnkey API
Turnkey's API client provides a `createPolicies` method that allows developers to pass in a list of policies to add to a specified organization. If only a single policy is needed, the `createPolicy` method exists as well.
Here's an example of using the API client to add the two policies we created above.
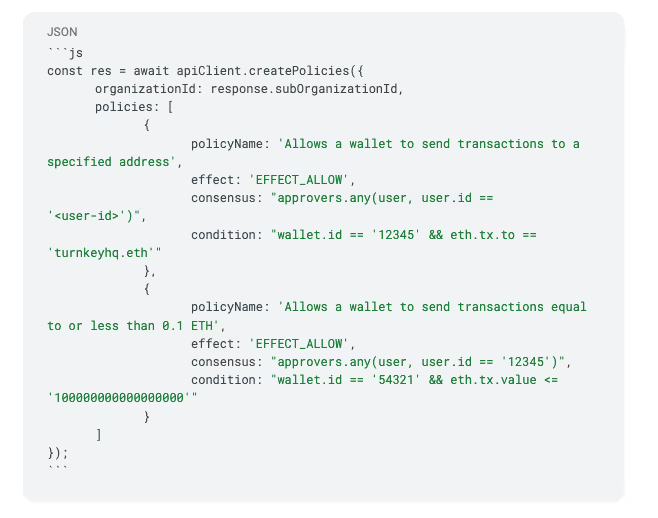
In the `organizationId` field, developers should pass in the ID of the sub-organization, and replace the user ID, wallet ID, and other values with the specific values related to their application.
Get started building with Turnkey
Fintechs and payment processors need a secure, user-friendly way to build crypto applications. Turnkey’s organization and sub-organization framework lets businesses achieve this. Within this framework, you can build flexible policies for your organization and users and keep the assets of both fully segregated and non-custodial.
You can learn more about how to write policies and start integrating Turnkey into your applications through our documentation. Also, check out our WaaS API blog post for a high-level technical overview of how our wallet infrastructure works.
To understand how Turnkey can help you provide a better and more secure wallet experience for your users, connect with our team, and they’ll help get you started.
Happy building!
Related articles

The developer tooling stack for building secure crypto wallets faster
Build secure digital asset products faster with Turnkey’s developer tooling for wallets and key management.

Turnkey’s 3 phases of secure software development
Explore Turnkey’s software development process. See how each stage turns source code into a cryptographically verifiable artifact that is built, approved, and attested.


